Friday Tip

Dear Constant Reader,

Greeting from San Jose, CA! I’m at Costume-Con this weekend. Two cross-country trips a week apart… I’m not exactly sure how that happened…

Anyhow, here’s your tip!

When measuring yourself for a costume or fitting one, ask a friend for help.

It’s possible, especially of you have an excellent dress form, to do this sort of thing yourself, but it’s always more accurate to do it on your own body. However, if you move, you’re changing your measurements. And you might need to contort yourself pretty seriously to reach parts of your body. I’ve been there. It’s much easier and more accurate to stand still and let someone else get the exact measurements or fit the garment on you.

This tip brought to you by Ava Fox crawling around on the floor Wednesday night after rehearsal to mark the hem on my new costume. My troupemates are the best.

M2These writings and other creative projects are supported by my 18 Patrons. Thank you so much! To become a Patron, go to my Patreon page. Or you can just tip me if you liked this.

Published in: on 21 April 2023 at 11:00 am  Leave a Comment  
Tags: ,

Friday Tip

Dear Constant Reader,

Just a quickie! Book is due today!

If your hem falls down, temporarily mend it with pastie tape!

M2These writings and other creative projects are supported by my 18 Patrons. Thank you so much! To become a Patron, go to my Patreon page. Or you can just tip me if you liked this.

Published in: on 31 March 2023 at 3:56 pm  Leave a Comment  
Tags: ,

Friday Tip

Dear Constant Reader,

Happy Friday! Here’s your tip!

Have a friend take your measurements.

The measurements will be more accurate because you can just stand still while someone else who can move around you makes sure the tape is in the right place and reads the results. When you’re measuring yourself, there’s always the chance the results will be slightly distorted since it’s hard to hold the tape on yourself without contorting a bit.

Also, a friend will give a more honest reading than you might give yourself.

Accurate measurements mean better fitting costumes, whether you’re making or buying.

M2These writings and other creative projects are supported by my 18 Patrons. Thank you so much! To become a Patron, go to my Patreon page. Or you can just tip me if you liked this.

Published in: on 10 March 2023 at 12:44 pm  Leave a Comment  
Tags: ,

Burly Bundle Mardi Gras Mask

Dear Constant Reader,

Back in December I posted about my first Burly Bundle and made an unboxing video. I thought you might like to see the finished results.

Untitled
Untitled
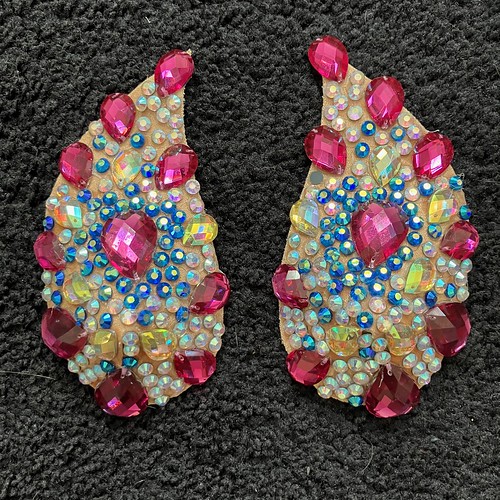
First I rhinestoned the filigree mask. I was a little daunted by those tiny yellow stones. They’re ss3! That’s like nail art size. I usually use ss16, 20, and 30 in my costuming. However, I used the included “rhinestone picker-upper” and it did make application very easy. Also, the rhinestone trays were very nice. I usually just use the lid of a jar or something similar. Tools that are actually designed for the job? What a difference!

I generally followed the included design plan for the mask. I could have gotten creative and maybe dipped in my own rhinestones to change up the colors, but I liked the suggested design just fine.

UntitledFor the feather ornament, I had a lot of options — there were three curled black feathers, six small white feathers and three black roses. And all the rhinestones leftover from the mask. I decided on one black feather, off-set with white behind and to each side.

Since I had such fun with the tiny yellow rhinestones, I gilded the roses with them. I did have a bad moment when I could only find two roses. Fortunately I discovered under which piece of furniture Bartholomew had batted the missing one.

It can be worn on the mask as shown or on its own as a hair adornment, so I made sure to orient the base so that the clip was in the best position for me to wear it in my hair as well.

And now I have a fancy mask for Mardi Gras next week! (Not that I’m actually doing anything for Mardi Gras, but it’s always good to be prepared.)

If you’re interested in Burly Bundle, I think signups for the next bundle are open until the end of February. The project is always a secret until you open the box. If you do want to try it out, please use this link. You’ll get a $5 discount and I’ll get a little referral fee. (Other than being a subscriber who’s having fun, I’m not associated with Burly Bundle.)

M2These writings and other creative projects are supported by my 17 Patrons. Thank you so much! To become a Patron, go to my Patreon page. Or you can just tip me if you liked this.

Published in: on 13 February 2023 at 1:27 pm  Leave a Comment  
Tags: ,

Friday Tip

Dear Constant Reader,

Happy Friday! What a contrast to last week — it’s positively balmy outside.

Before I get to your tip, Alice in Underwearland on February 18 at 8pm is sold out! However, we added a second show! If you missed out on tickets, you can join us at 10pm!

Clip your corners!

When sewing any kind of curves or angles, you need to clip the seam allowance to release tension or remove bulk. Allow me to explain with some hastily sewn and photographed examples.

UntitledCorners: cut diagonally across the corner above the point

UntitledConcave curves: cut little slashes up to the stitch line

UntitledConvex curves: cut little wedges out of the seam allowance.

In every case, you want to stay within the seam allowance. Get close to the line of stitching without cutting though it.

M2These writings and other creative projects are supported by my 17 Patrons. Thank you so much! To become a Patron, go to my Patreon page. Or you can just tip me if you liked this.

Published in: on 10 February 2023 at 1:16 pm  Leave a Comment  
Tags: ,

Friday Tip

Dear Constant Reader,

It’s a frigid day here in Boston, colder than it’s been in a long time and extremely windy. I hope wherever you are you’re keeping warm.

I know it’s been quiet here. I’ve been working on the second volume of my costume book, which besides writing, also means working on some sewing as I double-check some of my methods and techniques. Some of those projects will be seen in Alice in Underwearland at Deacon Giles on February 18 (the day before my birthday!)

With no further ado, here’s your tip, courtesy of Ava Fox!

If you have a costume piece that just won’t stay put, add a non-slip band of silicone.

Get a small tube of clear 100% silicone at the hardware store. There are big tubes that require a caulk gun; you want the little ones that look like toothpaste tubes. Run a bead of silicone on the inside of your costume where you want it (like the band of your bra or the top of your stocking) Then wet your finger and smoosh down the silicone so it’s a flat strip. Let dry and revel in how well your costume stays in place.

Pro tip from Scratch: wear a latex glove for easy clean up. Silicone is very sticky and water-resistant. Getting it off your skin is a chore.

Ava used this trick on the garters for her new Cheshire Cat act. Come see it on the 18th!

M2These writings and other creative projects are supported by my 17 Patrons. Thank you so much! To become a Patron, go to my Patreon page. Or you can just tip me if you liked this.

Published in: on 3 February 2023 at 3:39 pm  Leave a Comment  
Tags: ,

Friday Tip

Dear Constant Reader,

This coming Tuesday I’m teaching Getting Tight: A Guide to Corsetry on-line. You’ll learn about different types of corsets, what to look for when buying one, tips for making one, history, how to wear them and how to strip out of them. Here’s a little something:

Wear something under your corset to keep it clean.

Corsets are very hard to wash, because of all the metal in their construction. To keep your corset clean and smelling pleasant, wear it over a base garment. I know that’s not feasible if you’re stripping, but you’re also only wearing it for a relatively short time. If you’re wearing one for a photoshoot, a party, or some other kind of event, do try to wear something between the corset and your skin. I like a camisole, but if you want something that’s not going to show at all, a tube top is a good option.

For more about corsets, join me Tuesday night, 7pm Eastern!

M2These writings and other creative projects are supported by my 17 Patrons. Thank you so much! To become a Patron, go to my Patreon page. Or you can just tip me if you liked this.

Published in: on 20 January 2023 at 3:14 pm  Leave a Comment  
Tags: , ,

Friday Tip

Dear Constant Reader,

It’s Friday! How about a tip?

When sewing velvet, only pin within the seam allowance.

Velvet has a lush look and catches the light in interesting ways which makes it a  natural for adding drama on stage. However, the pile can crush easily while you are sewing it and the marks are very hard to get out. Pinning where it won’t show on the outside is the key to keeping your velvet beautiful. And a pinboard, but that is a tip for another time.

M2

These writings and other creative projects are supported by my 18 Patrons. Welcome to my newest Patron, peter hopmann. Thank you so much! To become a Patron, go to my Patreon page. Or you can just tip me if you liked this.

Published in: on 4 November 2022 at 3:30 pm  Leave a Comment  
Tags: ,

Review: The Costumes of Burlesque

Dear Constant Reader,

I can’t believe it’s taken me so long to review this glorious book. Scratch brought me back a freshly-released copy from the Burlesque Hall of Fame Weekend in 2019, so it’s recently celebrated its third birthday.

The Costumes of Burlesque 1866-2018 by Coleen Scott, 2019.

Coleen Scott (aka Rosey La Rouge) is a costume designer with a passion for burlesque. Her first book, The Pastie Project*, focused on that specialty adornment unique to burlesque. This tome shows everything.

It’s a chronological look at burlesque costumes from the 19th century until the present day, with each chapter spanning a couple of decades. Every chapter is illustrated with images of burlesque performers in costume and color photographs of extant costumes. The absolute best part is that Scott shows you all the layers when possible. It’s one of the challenges of displaying burlesque costumes (as I well know from mounting exhibits at the American Burlesque Collection), seeing only one part in isolation does not give you a full appreciation for the design of these costumes.

There are not a lot of extant early burlesque costumes, so she fills out the first chapter with images of performers and existing costumes for similar performances — ballet, cancan, circus, bellydance, Loie Fuller. As the chapters progress, more and more extant costumes are included (many from the collection of Nez Kendal) and we get to see details, sometimes even the insides. Still, photos of performers, posters, and other ephemera probably outweigh costumes. She touches briefly on a variety of costume styles, like half-and half acts and drag.

The very last chapter — Modern Burlesque Costume Design — features layer by layer photos. Dirty Martini, Cheeky Lane, Gin Minsky, and Darlinda Just Darlinda wear their costumes and strip for the camera, showing every piece as they go from full ensemble to pasties. They’re each on a plain white background which highlights the costumes in a way that’s impossible on stage. There are also close looks at individual components. It’s probably the best view of each costume possible, short of having the  owner show it off in person.

[Please note that while most of Gin Minsky’s quick-change costume was made by Garo Sparo, her Screen Siren G-string was created by Manuge et Toi Designs and the blue gown was rhinestoned by Canova Studio, who were not credited. I’ll assume that was an oversight.]

It’s a lovely book to just flip through and look at the gorgeous photographs, but the text is enlightening too. There are interviews with Legends, current performers, and costume designers. There are notes at the end of each chapter and a bibliography in the back. Throughout the book words in red can be found in a helpful glossary of terms for those unfamiliar with burlesque and its specialized language.

It’s impossible for one book to be completely comprehensive on any topic, and there are, of course, omissions, but Scott covers a lot of ground and has created a beautiful work. It’s not inexpensive, even in softcover, but worth it.

M2

*Which I don’t own…

These writings and other creative projects are supported by my 14 Patrons. Thank you so much! To become a Patron, go to my Patreon page. Or you can just tip me if you liked this.

Published in: on 20 July 2022 at 2:43 pm  Leave a Comment  
Tags: ,

Making Do and Mending

Dear  Constant Reader,

VRA few years ago I made a costume for the Historical Masquerade at Costume-Con 33. You can read all about it here. Short version: what if the Victoria’s Secret fashion show was actual held in the Victorian era. Thus, Victorian Secret! I made a historically accurate Victorian corset — that is, accurate in pattern and construction, not the thousands of rhinestones decorating it — and drawers and a chemise. The mantle and crown are because my theme was Victoria’s coronation.
(Photo by Ken Warren)

MISSMINAMURRAY_AnthonyJColegaI spent a lot of time and effort on the corset because I knew I’d use it again in a burlesque costume — which I did. I also entered said costume at Costume-Con 37 and you can see it in our show on April 30. However, I didn’t think I’d ever wear the drawers and chemise again. I hated to just have them hanging in the closet, but it’s not like I frequently wear Victorian attire and they were vital to the costume presentation.
(Photo by Anthony J. Colega)

I realized recently that the drawers and chemise would make great summer lounging attire. It gets hot in my atelier, despite the ceiling fan the ever-thoughtful Mr. Scratch installed, and the underthings are made of thin, nay, even  translucent, cotton (I’m wearing pasties under them in the above picture. Just in case). The pretty pintucks and lace are just a bonus.

Unfortunately, the drawers had fallen off the hanger to the floor of my closet and during a mouse infestation, got nibbled. There were wee holes chewed hither and yon. The good news was they were only on one leg. The bad new was that they were so numerous and wide-spread that patching was not an option.

Fortunately, I had just enough cotton left over to cut one new leg. Then I stalled because I really didn’t feel like doing another set of pintucks, especially when the first ones were so even and matched so nicely on each leg.

Then I had an inspiration — I pinned the old leg and the new leg together and marked the stitching line for the first row of pintucks. I cut the old leg above it and the new leg below it. Then I sewed the new leg and the pintucked bit together just at that stitching line, using my stitch-in-the-ditch foot (also called an edge joiner). You can’t even tell  there’s a seam there!

Because the fabric is so sheer, the seam allowance was visible from the outside if I pressed it open, so I flat felled the seam toward the tucks and sewed it down with very teeny hand stitches behind the first pintuck where the extra fabric hides the seam.

Mended Victorian DrawersTada! I can’t even tell which leg is the mended one unless I turn the drawers inside out. I’m glad I was able to salvage these from the ravages of rodents and I’ll have something cool and comfy to wear this summer whilst I sew.

M2These writings and other creative projects are supported by my 14 Patrons. Thank you so much! To become a Patron, go to my Patreon page. Or you can just tip me if you liked this.

Published in: on 15 March 2022 at 3:21 pm  Leave a Comment  
Tags: , ,