Recently Scratch bought me this vintage pattern:
Yes, that’s a bikini, designed by famed pin-up and photographer Bunny Yeager! The pattern has only one size, no seam allowances, and directions are fairly minimalist. This is not for the beginning seamstress.
I decided to try it out without any alterations, just to see what size the base pattern was. I picked some fabric I didn’t care much about in case this was a major fail, but was still pretty in hopes that the garment worked. First step was tracing the pattern (you don’t cut something of this historical value!) and adding my preferred seam allowances.
There was a note that the bikini should be lined in white cotton broadcloth, which was a great suggestion. Not only would that reduce any see-through issues with the fabric, but the bottoms were designed with only two-pieces, which would leave a seam at the crotch. With a lining, all seams would now be enclosed.
Cutting and sewing the bottoms was pretty straight-forward. However, there are no instructions for working with the elastic. I frequently make panties, so I didn’t think it would be a big deal — and it wasn’t. To my great surprise, the bottoms fit almost perfectly. The only hitch was that my elastic was on the older side and wasn’t as elastic as I thought, so things bag a little more than I expected.
I had my doubts about the bikini top, as the sole pattern piece was a rectangle with a casing on the top and the bottom. I expected a darted triangle, but I’m game for anything. Thanks to a clever neck strap, the cups are adjustable, attractive and support very nicely. Admittedly, I’m not as well-endowed as some of the BeauTease, but there’s not an insignificant amount to lift and keep covered.
And here is the final result!
Photo by Scratch
These writings and other creative projects are supported by my Patrons. Thank you so much! To become a Patron, go to my Patreon page. Or you can just tip me if you liked this.
Happy Friday! Tonight I’m teaching Blonde Bombshell, a one-hour on-line workshop as a fundraiser for BurlyCares. Go here for more information and to register. It’s pay-what-you-can and every penny goes to BurlyCares to support our Legends!
Sunlight is no good for fabric. It will fade and degrade in the light. (Take my class Caring for Your Costumes to learn more!) The best place for your costumes are in a closet or inside drawers. I know that’s a luxury not everyone has. Storage boxes are one option. If you keep your costumes on a freestanding clothing rack, just toss a sheet or a similar cloth over it. Added bonus is that it keeps out dust as well!
These writings and other creative projects are supported by my Patrons. Thank you so much! To become a Patron, go to my Patreon page. Or you can just tip me if you liked this.
Here it is, Friday again. Time for a tip! But first a few announcements…
On Tuesday, B.A.B.E. will be presenting “Burlesque” Means “Comedy”, a brand-new workshop from Mr. Scratch. Some of the most famous American comics got their start on the burlesque stage. Burlesque has its roots in a long comic tradition — and a lot of modern comic traditions have their roots in burlesque. This class is a look at the evolution of burlesque from the commedia dell’arte of the 16th century to the modern day. Through video, readings of actual burlesque comic scripts, and a discussion of the rise and fall of the comedian in the world of burlesque, students will gain a deeper understanding and appreciation for what burlesque was and can be.
Please fill out this survey about classes at B.A.B.E.! Help us bring you the class experience that you want!
The Boston BeauTease have a new show premiering in just a week! To celebrate the second season of The Umbrella Academy, we are presenting The Underwear Academy. This streaming show is like nothing we’ve ever done before, in so many ways! Join us Saturday, August 1 at 8pm. Get your tickets here! Note: All tickets are exactly the same regardless of price. Once you purchase a ticket you will be emailed a link and password to access the show. You also get access to a post-show Zoom with the cast!
And now for your tip!
Make a pattern to cover your bra cups.
Sure, you can work free-hand to cover the cups, but making a pattern beforehand in scrap fabric reduces the chance of mistakes which will end in tears. It’s especially recommended if you’re working with expensive fabric or doing any kind of pattern matching or mirroring.
Also, if you use a particular style of bra a lot, you can save yourself a lot of work by having a pattern ready to go! When I cut out my tags, I tack them to the pattern, so I know the size and style.
These writings and other creative projects are supported by my Patrons. Thank you so much! To become a Patron, go to my Patreon page. Or you can just tip me if you liked this.
About a thousand years ago, I ran a little contest where my Constant Readers would vote on a pattern from my collection and I would make the dress. The winner was “Fifties’ Fit & Flair” by Folkwear, a now out-of-print pattern. You can read all about the process here.
However, I left you hanging with a dress that didn’t fit quite right. So what happened?
I tossed the dress in my “unfinished” pile and it languished there for years. Last week I unearthed it and decided it was a shame to abandon it. The skirt was perfectly good, very full and it had pockets. I ripped the bodice off and added a waist band. Voila, a circle skirt!
(Not the greatest picture of it but Albert was sprawled right where I wanted to stand)
I’m sorry I couldn’t make the bodice work, because I did such a perfect job of pattern matching the front. But I never loved the dolman sleeves, so in the end, it’s better.
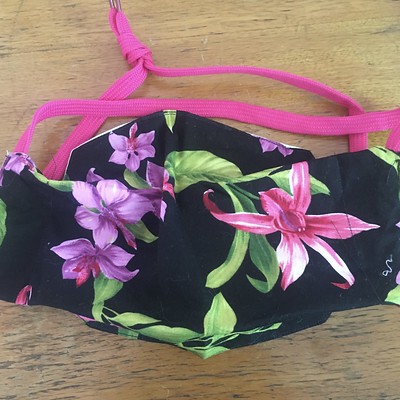
Also, obligatory matching mask.
Maybe I’ll do another one of these “dress me” polls, but this time I’ll need to use a pattern from my collection AND fabric from my stash. I have too much fabulous fabric sitting around doing nothing.
These writings and other creative projects are supported by my Patrons. Thank you so much! To become a Patron, go to my Patreon page. Or you can just tip me if you liked this.
A properly fitting corset will have a gap of a couple of inches in the back.
If you can lace your corset completely closed, it’s too big for you. If the lacing reveals most of your back, the corset is too small for you.
A good rule of thumb is that the gap should be about 10% of the corset size. For example, if you wear a 28, a gap of 2 to 3 inches is just fine.
For more about corsets, you can take Getting Tight: A Guide to Corsetry, my on-line workshop on Thursday, June 18. Learn all about buying, making, wearing, and removing corsets, plus an illustrated history of the garment (aka corset porn).
These writings and other creative projects are supported by my Patrons. Thank you so much! To become a Patron, go to my Patreon page. Or you can just tip me if you liked this.
This week your tip is from special guest contributor, Devastasia!
Threading elastic (or whatever) through things with a bobby pin of some kind is 1000x easier than using a stupid safety pin..
Brilliant!
These writings and other creative projects are supported by my Patrons. Thank you so much! To become a Patron, go to my Patreon page. Or you can just tip Devastasia if you liked this.
A pill bottle makes a great, secure container for transporting pins and needles.
I know none of us are traveling these days, but back when I was sewing outside of my own house, I always carried one of these in my portable sewing kit. You always know where your sharps are and they can’t fall out, like with a pincushion.
Once upon a time I used film canisters, but who has those hanging around any more?
These writings and other creative projects are supported by my Patrons. Thank you so much! To become a Patron, go to my Patreon page. Or you can just tip me if you liked this.
My brilliant and creative friend Rae Bradbury-Enslin has come up with a super efficient method to sew Deaconess-style masks. You can find the original post on her FB, but here it is, step by simple step.
Instead of cutting all the masks to size, cut or tear your fabric at 12” lengths, fold over with right sides together, and sew the long seam (1/4” seam allowance) creating a tube. (If you’re using different fabrics for front and back, this works as well. Just cut the pieces a smidge larger and sew along both long edges.) Flip the fabric and press the seams flat. You should have a long tube about 6” wide.
Cut tube in 9” segments.
You will end up with several mask rectangles that are open on both ends.
Fold both ends inside about a half inch, press flat.
Iron in your pleats as demonstrated. [I can’t get the video to play on my site — go here for now]
Once your pleats are ironed, you should be ready to sew without needing pins.
Insert one end of a 7” piece of elastic at the top corner and sew down. Double stitch for strength.
Begin to sew the pleats down, inserting the other elastic end at the bottom corner as you go. Double stitch at the corner.
Start the next mask immediately, with no space. Repeat the process above with next mask
You can do as many masks in a chain as you’re comfortable with.
Flip your chain over and repeat process on other side. Note that you will be sewing against the pleats, so just make sure they’re feeding under the foot properly and they should be ok.
Chain of finished masks!! Just snip in between and they’re ready to go! 😊
Feel free to share this very efficient method, Dear Readers, but please give the credit to Rae Bradbury-Enslin.
I’ve been posting weekly tips here for over 8 years! I want to start creating video tips as well, but, as I realized when I tried to film one this week, I am sadly in need of better equipment! I had a holder for my phone and I had a tripod, but it turns out they’re not compatible! Fortunately, I am an experienced MacGyver (I was once even nominated for a Golden Pastie in that category) and with some painter’s tape and other things I found around the house, managed to mate them long enough to film, but it was really awkward.
If you would like to see video Tips and tutorials, consider becoming a Patron! With more Patrons, I can splurge on some better equipment and maybe even have someone else involved, which will make for *much* a better quality product. The videos are going to be Patron only!
And now for your tip…
Sequined fabrics require special treatment when sewing.
First off, the sequins will dull your scissors, so don’t use your best fabric shears to cut out your garment.
They’ll dull your needles too, so remove all the sequins from your stitching lines. Sequins add bulk, so also remove them from the seam and hem allowances. And they’re scratchy. You’ll be just as happy not having them on the inside of your garment.
Removing sequins is a little tedious, since you don’t want to snip the threads holding the sequins in place — you’ll lose all the other sequins on that thread. Instead, snip the sequin itself (again, not with the good scissors!). Put down a dropcloth before you start because this will get messy! You’ll also need to do the same thing if you’re working with beaded fabric, but you can just smash the beads (lightly!) with a hammer. Wear eye protection!
When sewing the fabric, wear the above-mentioned eye protection as well, just in case you strike a sequin by mistake and your needle breaks.
When pressing sequined fabric, always use a press cloth to protect the sequins from the heat of your iron. They’re only plastic and can melt or discolor.
Save your fabric scraps, so if you lose some sequins on your finished garment, you can harvest some from a scrap and sew them on the bald spot.
These writings and other creative projects are supported by my Patrons. Thank you so much! To become a Patron, go to my Patreon page. Or you can just tip me if you liked this.
One of my sources of inspiration and creativity this winter has been Christine McConnell. As a Patron of hers, I get access to exclusive content and in November that was how to make the coffin-shaped gift box she packaged her aprons in.
Betty Blaize, although she famously doesn’t enjoy cooking, has been spending more time in her kitchen, cooking healthy food, so an apron sounded like a way to encourage her culinary efforts. I ordered her a cute one, but then I got an email that the seller canceled the order (it’s complicated). I panicked a little as it was getting close to Christmas, but Scratch pointed out that I could whip up an apron in no time flat. I found some cute pink cotton with big white polka dots and made her a chef-style apron that could actually be worn and washed without fear (and has pockets). Of course, the cute apron wasn’t actually cancelled and arrived the next day, so she got both.
Back to the box. I used the template pattern Christine provided Patrons at my level, which made things go much faster. I ended up using FOUR different kinds of glue on this project — spray adhesive, fabric glue, hot glue, and a glue stick. I’ll probably never work with spray adhesive again. I thought it would be easier and more accurate, but it was so messy. Since I wanted to keep the spray adhesive far away from Albert, I took everything into the basement and set up on top of the laundry machines. Not an ideal work environment, but needs must. Part way though I bemoaned the third-grade craft project look of the box and decided to give up. Scratch convinced me to see it through. And he was right. Once I starting decorating it, it began to look more polished.
I covered the outside of the box in pink satin and lined it with the same polka dot fabric I used for the apron. I had *just enough* of the polka dot fabric to line the box, but that meant I had to use a piece with a stain on it. I couldn’t gift it looking like that, so I glued a couple of white lace butterflies over the offending spot.
I trimmed it all with two styles of black lace, some black lace appliqués, and both pink and black ribbon. I had to buy the pink satin for the exterior and the narrow pink ribbon that covers the seams, but everything else came out of my stash. My only regret was that I couldn’t find the black silk roses I know are hiding somewhere in my atelier.
One of the finishing touches is to add a drop shadow behind the cut-out on the lid. I got a piece of black posterboard to make the shadow and discovered it was bright orange on the reverse! It was also too small to cut out the entire shadow, which serves to finish the inside of the lid. I glued the orange side to it a piece of larger white posterboard and cut the whole thing out as one. A little black Sharpie was needed to touch up one spot where I miscalculated the alignment, but you can’t even tell.
The final step was to add a window of thin acrylic, which makes the box more finished-looking and strengthens the lid. I could not find a piece of acrylic both thin enough and large enough at any store. I was starting to get concerned when I found a cheap poster frame lurking behind the door of the library at the Manor. Whatever purpose it was supposed to serve before, it was a coffin widow now. The edges were just a bit raggedy in places after I cut it (I probably should have changed blades in my utility knife at that point), so after I glued it in place, I went around the perimeter with cloth tape. It looks nicer and there’s no chance of damage (to the window or a person).
And voila! The final product!
You can get a closer look with this little video. I’m still learning iMovie, so I’m grateful to Scratch for editing help.
I’m very pleased with how it came out and I hope Betty is happy with it!
These writings and other creative projects are supported by my Patrons. Thank you so much! To become a Patron, go to my Patreon page. Or you can just tip me if you liked this.


 These writings and other creative projects are supported by my Patrons. Thank you so much! To become a Patron, go to my Patreon page. Or you can just tip me if you liked this.
 On Tuesday, B.A.B.E. will be presenting
  The Boston BeauTease have a new show premiering in just a week! To celebrate the second season of The Umbrella Academy, we are presenting
 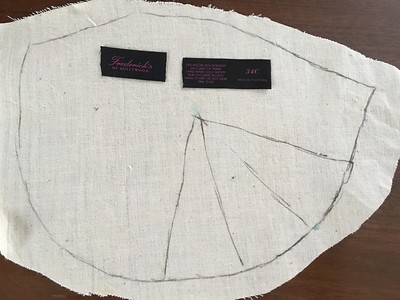 Make a pattern to cover your bra cups.
 A properly fitting corset will have a gap of a couple of inches in the back.
 Threading elastic (or whatever) through things with a bobby pin of some kind is 1000x easier than using a stupid safety pin..
 A pill bottle makes a great, secure container for transporting pins and needles.
 Instead of cutting all the masks to size, cut or tear your fabric at 12” lengths, fold over with right sides together, and sew the long seam (1/4” seam allowance) creating a tube. (If you’re using different fabrics for front and back, this works as well. Just cut the pieces a smidge larger and sew along both long edges.) Flip the fabric and press the seams flat. You should have a long tube about 6” wide.
 Cut tube in 9” segments.
 You will end up with several mask rectangles that are open on both ends.
 Fold both ends inside about a half inch, press flat.
 Once your pleats are ironed, you should be ready to sew without needing pins.
 Insert one end of a 7” piece of elastic at the top corner and sew down. Double stitch for strength.
 Begin to sew the pleats down, inserting the other elastic end at the bottom corner as you go. Double stitch at the corner.
 Start the next mask immediately, with no space. Repeat the process above with next mask
 You can do as many masks in a chain as you’re comfortable with.

 Sequined fabrics require special treatment when sewing.
 I covered the outside of the box in pink satin and lined it with the same polka dot fabric I used for the apron. I had *just enough* of the polka dot fabric to line the box, but that meant I had to use a piece with a stain on it. I couldn’t gift it looking like that, so I glued a couple of white lace butterflies over the offending spot.
